The school year is just around the corner, and you know what that means: new (to you) books!
(Of course, we here at Redeemed Reader think every day is a day for new-to-you-books, ahem.)
The difference between school books and leisure reading books is significant: one of those books might linger peacefully on a nightstand or lounge around on a bed all day.
The other is destined for indentured servitude: thrown in a locker every day for nine months. Read by multiple siblings in a homeschool setting over the course of several years. Marked up, hauled around, thrown in a backpack, sold and resold, used and re-used. In short, books used for education have a hard life.
They need protection.
They need a book cover (we library people call that a dust jacket).
 I can whip out a handy book cover from a grocery store brown paper bag in minutes. I used these for every one of those textbooks I “checked out” from my teachers in August and had to return to their watchful eyes in May. I never once had a fine slapped on me for damage.
I used these in grad school if I wanted to be able to resell a “like new” textbook, for my own children when they started school, and antique books for a season if they are going to be used heavily (and then I take off the covers so my bookshelves look pretty again). I used clear ones as a librarian, too, but the process is the same and, bonus, the brown paper ones are free.
**This process can be used with paperback books, but it is far easier with hardback books. Start with your BIGGEST book because you can re-use the bag for a smaller book if you cut the first one too small.***
Step 1: Gather Supplies
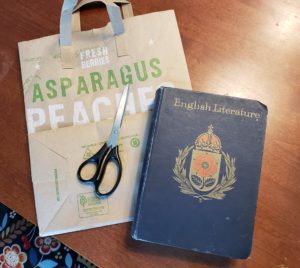
- scissors
- book(s) to cover
- packing tape or duct tape*
- standard grocery store brown paper bags
*masking tape and Scotch tape don’t stick well to brown paper. Clear packing tape is handy, but if your child wants to make a statement (or, if you are a home educator and want to be able to tell at a glance who left their book lying on the dining room table), colored duct tape is awfully fun.
Step 2: Disassemble the Brown Paper Bag
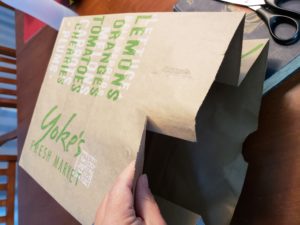 Pull off any handles. Split the seam on the back (you may have to cut this; not all glue comes apart easily). Cut around the base. Spread out the one long piece of brown paper you now have.
Step 3: Align the Book and Paper
Make sure the grocery bag is design-side up. You don’t want that grocery store label on the outside of your book. (Some of the pictures show my brown paper bag backwards; I had to refold it because I wasn’t paying attention!) Place the book you wish to cover on the brown paper.
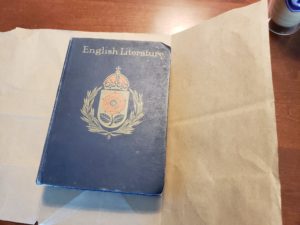
I like to line up the right side of the back cover of the book with the vertical fold near the right edge of the big piece of brown paper (see picture). Be sure there’s enough leftover brown paper to make a good flap.
Center the book top to bottom.
Step 4: Fold Top and Bottom Edges
Once the book is lined up where you want it, fold the brown paper bag up over the top edge of the book’s back cover. Make a crease with your fingers on the paper where it curls over the edge of the book. Do the same on the bottom edge. It’s better to have a little extra than to be too short.
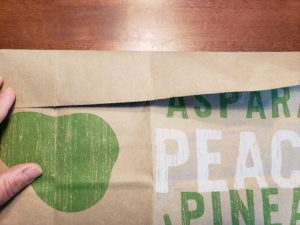
Remove the book, and, using the handy creases and seams in the bag to help you fold straight, fold those two edges all the way across the the paper. Line up the creases vertically with one another in a few spots, and you should end up with a straight fold. In the picture, you can see a crease running through the pear shape and just to the left of the “Peach” word. I’ve lined up the creases on my flap with the ones on the main part of the bag.
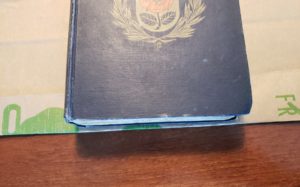
With the folds in place, put the book back on and double check length. If there’s no extra paper visible at the top or bottom, unfold one section and refold a little more generously. You want a small margin of paper–enough so that when you slip the book’s cover into the flaps later, the paper won’t be too tight. (See picture above for an example of enough margin.)
Step 5: Cut Sides to Measure
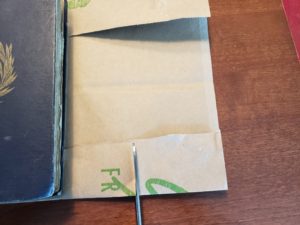
With the book lying in place, cut any excess paper off the right hand side. You want to leave enough of a flap so that it will cover about half of the book’s original hard cover when folded over–this is so your book’s actual cover won’t slip out of the protective cover when it’s carelessly tossed aside lying open. Better to cut a little extra width at this point; you can always trim it later.
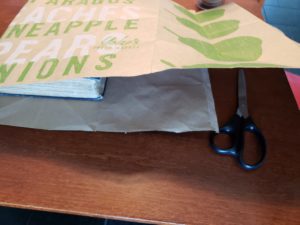
Fold the left side of the paper over the closed book and roughly cut the same length on the second side. It doesn’t have to be exact. (The picture shows this process before I’d folded the top/bottom flaps. Steps 4 and 5 can be switched.)
Step 6: Fold Side Flaps
Line the book up top to bottom. Slide it to the same spot on the right from which you did your earlier measuring (again, this is why that pre-made crease is so handy!). Fold the right-hand side over the back cover of the book with the book as closed as possible. You will have to open the book slightly to fold the paper over the cover, but the back of the book should be lying as flat as possible on the table.
CLOSE THE BOOK ALL THE WAY WHEN THE FIRST FLAP IS FOLDED IN.
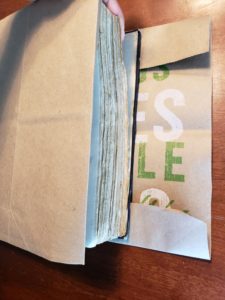
You can flip the book over again so that you’re folding the remaining flap “up” over the book’s back cover instead of down over the front. It doesn’t matter as long as the book is mostly closed (otherwise, the cover will be too snug). Fold the paper over the book and make a slight crease where the paper bends on the righthand edge of the top cover. Open the cover just enough to fold that flap in. Close the book again and press those creases in place as much as you can.
Step 7: Put the Book Cover On
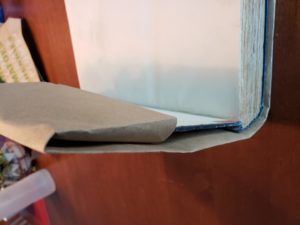
Open the book (all the way), and slide the book’s actual covers into the flaps on each side. Be sure to slide the book into the slot made when you folded the paper edges over. You want total coverage on those corners. The cover should now stay in place without any tape.
Step 8: Check It Once, Check it Twice
Fold the book closed with the cover in place. Make sure the corners aren’t bending or pulling. Make sure the edges are all protected where they should be. Refold for extra space if you need to.
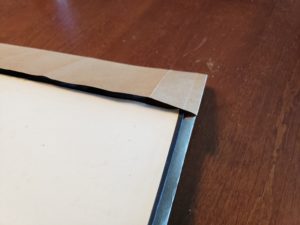
Now, open the book partway, as if you were reading it. Check to make sure the book’s flaps aren’t sliding out of the book cover’s flaps or almost sliding out. If they are, you will need to start again with a bigger flap! The flaps pictured just above are too small and come off the book’s cover too easily. (You can use the “too small” cover to simply cover a small book. You will need to start over, but you won’t have wasted the brown paper bag.)
Step 9: Tape the Cover
The tape is crucial for longterm book cover success!
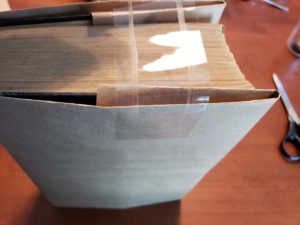
Starting with the front of the book, place the tape near to the side edge of the inside flap on the back of the book’s cover (same side–see the picture). Positioning the tape close to the side edge of the inside flap (without taping the book itself) will give more stability and longevity to your book cover.
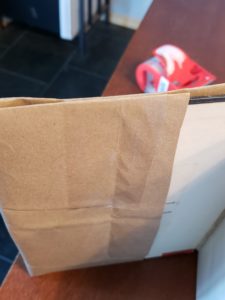
Hold the paper cover in place so that the sides line up correctly and fold the tape over into the inside of the book’s flap. ***Check to make sure your tape stays only on the paper cover and doesn’t accidentally stick to the actual book cover.***
Tape the bottom of the same side before repeating the process on the back cover.
Step 10: Create New Cover Art
Close the book with the book cover on and admire it. Check the fit. Be sure you like it (better to start over now than later.)

When you’re satisfied with the fit, take some time to create new cover art. This is crucial. Lest you think this isn’t important, let me remind you: it’s impossible to tell, without opening the book, which side is right side up! It’s also impossible to tell whose book is whose or which book is which. They all look the same now, and you’d be amazed how similarly sized some books are. Owner or student names on the outside are handy, but you can also write them on the inside flap.

It’s also a good idea to label the spine of the book, especially if it’s going to be on a bookcase!
Have you ever made a brown paper bag book cover?
Support our writers and help keep Redeemed Reader ad-free by joining the Redeemed Reader Fellowship.
Stay Up to Date!
Get the information you need to make wise choices about books for your children and teens.
Our weekly newsletter includes our latest reviews, related links from around the web, a featured book list, book trivia, and more. We never sell your information. You may unsubscribe at any time.
We'd love to hear from you!
Our comments are now limited to our members (both Silver and Golden Key). Members, you just need to log in with your normal log-in credentials!
Not a member yet? You can join the Silver Key ($2.99/month) for a free 2-week trial. Cancel at any time. Find out more about membership here.
4 Comments
Leave a Comment
You must be logged in to post a comment.


Wonderful 10 steps… Brilliant tutorial.
Thank you for this tutorial!
It is nice post, thanks. Why don’t you make video how to do it and post on tiktok? I like to watch such lifehacks there. Don’t worry about tiktok likes, it is easy to get it now. Read it https://loop21.com/leave-online-promotion-to-professionals-concentrate-on-creating-unique-content and you understand
Thanks for the suggestion, Samuel. We’ve talked about posting videos and even getting a YouTube channel–could happen!